Monday, December 24, 2012
Eggnog Gingerbread Trifle
We had an early celebration yesterday with my brothers and their family. It was so nice to get together after so many years apart. I love making desserts. I made a beautiful eggnog trifle and cheesecake. The trifle was a big hit. I substituted light eggnog and light cool whip for the topping. The gingerbread cake was a cake box purchased just adding 1 egg and water. I also layered raspberries between the layers and topped with the raspberries on top with crumbled gingerbread topping. The original recipe can be found here http://www.the-girl-who-ate-everything.com/2010/12/eggnog-gingerbread-trifle.html . I added to my Santa Claus mug collection. I have original Santa Clause mugs that must be over 50 years old originally purchased by my grandmother. Pottery Barn started remaking the mugs last year and each year I add to the collection. This year I purchased the Santa Claus cookie jar which is so cute. www.potterybarn.com If you don't buy these at the beginning of the season, they are tough to get close to Christmas. Don't wait for the sale on them, they will be gone. Next year I hope to add the cookie plate. The kids love these.
Friday, December 14, 2012
I had so much making this wreath! I purchased a store bought pre-made simple green wreath with a few pine cones already on it. I added peacock feathers and Christmas Balls of silver, blue and green. Attach the extra items with floral wire. I would not suggest the use of HOT GLUE, since it melt when in a hot room or outside in the sun. Simply wrap the end of the wire to the top of the decoration and then attach them in clusters together. Then in sets of three or four balls, attach them to the wreath. The second wreath pictured was my inspiration piece. The second wreath can be purchased at http://thegreendoorathome.com/! Happy Holidays everyone...
Friday, July 13, 2012
Easy Summer Trifle
Easy Summer Trifle
Ingredients:
2 Pound Cakes or 2 Angel Food Cakes (can get by with 1, but two works best)
1 14 ounce can of sweetened condensed milk
1 1/2 cups cold water
1/2 cup of raspberry preserve
1 Pint Raspberries
1 Pint Blueberries
1 Pint Strawberries
Trifle Bowl or Large Bowl
Mix condensed milk and water well. Fold pudding mix into condensed milk mixture and beat at low speed with hand mixer for 2 minutes. Place 1 pint of heavy whipping cream in a small bowl. Beat cream until whipped (light and fluffy mixture). Fold whipped cream into pudding mixture.
Saturday, May 19, 2012
Chair/Plant Stand Redo Tutuorial
Chair Re-Do... trash finds...Before & After
Plaint stand...more trash finds... Before & After
I found this antique chair and plant stand in the trash. I thought they would make a perfect addition to my new sewing room...which has been on my wish list for months since my son moved into his new home and I have a spare room to design. So I have this big empty room that I have been slowly thinking about how I want to design it when I came upon these two wonderful items. You can view many of my items on my wish list for my new sewing room at http://pinterest.com/aggieray/sewing-room/.
Chair Before
Plaint Stand Before
.
remove seat cushion, usually it is screwed thought the bottom
Cover stained chair and plant stand.
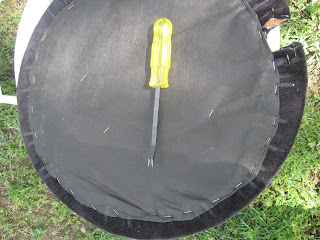
While stain was drying, I started on the seat cushion. remove stapled with an upholstery staple remover. Worth the investment, saves time and fingers. You may also use pliers. This chairs padding was worth saving. It was in great shape. I wanted to added extra softness, so I added more batting. Cut a piece larger than the chair cushion allowing the batting to lap over the sides and to the underside, enough for stapling.
Existing chair padding
Batting on top of existing chair padding, lining on top of batting. I added a piece of white lining before my top fabric to so the look of the cotton quilt fabric which I chose would be have a smooth appearance.
Flip chair cushion upside down. Align lining and batting for stapling. Place 4 staples in the lining, one staple on each quarter side. Next, move around the piece gently holding lining in place and ease fabric as you staple. Slip over the result is a nice smooth surface for your quilt fabric:Ease fabric as you staple.
I had to work with two small cut outs in my chair cushion. After the the majority of the cushion was stapled in place, I place two small slits in the center of the cut outs and worked the fabric in the cut out and stapling along the way.
Thanks to http://www.centsationalgirl.com/2012/04/gold-leaf-desk-chair/ I decided to use the Benjamin Moore "Thunderbird" Advanced Paint in a high gloss finish. It is a beautiful paint to work with.
Apply paint with a good quality brush,makes a huge difference in the look. Allow to dry 24 hours before using. I attached the completed seat cushion with the existing screws. All ready for my new sewing room... which is months away from being started :(. Hope to detail that too!
Subscribe to:
Posts (Atom)


